Contents
Traceur (pronounced like trace + connoisseur) is a path tracing renderer written in Ink. Traceur is capable of rendering scenes with spherical objects, realistic shadows, reflections, refractions, and depth of field. Internally, Traceur uses well-defined interfaces for working with shapes, materials, and scene descriptions, so it’s easy to extend with new textures and lighting effects.
See Traceur on GitHub → Try Traceur Web →
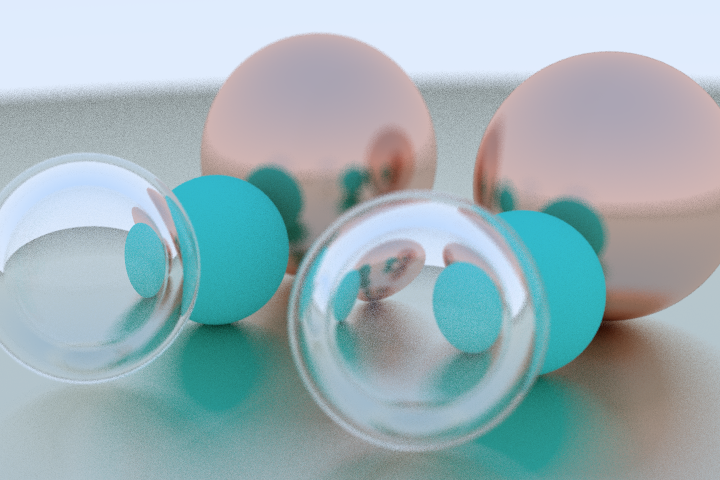
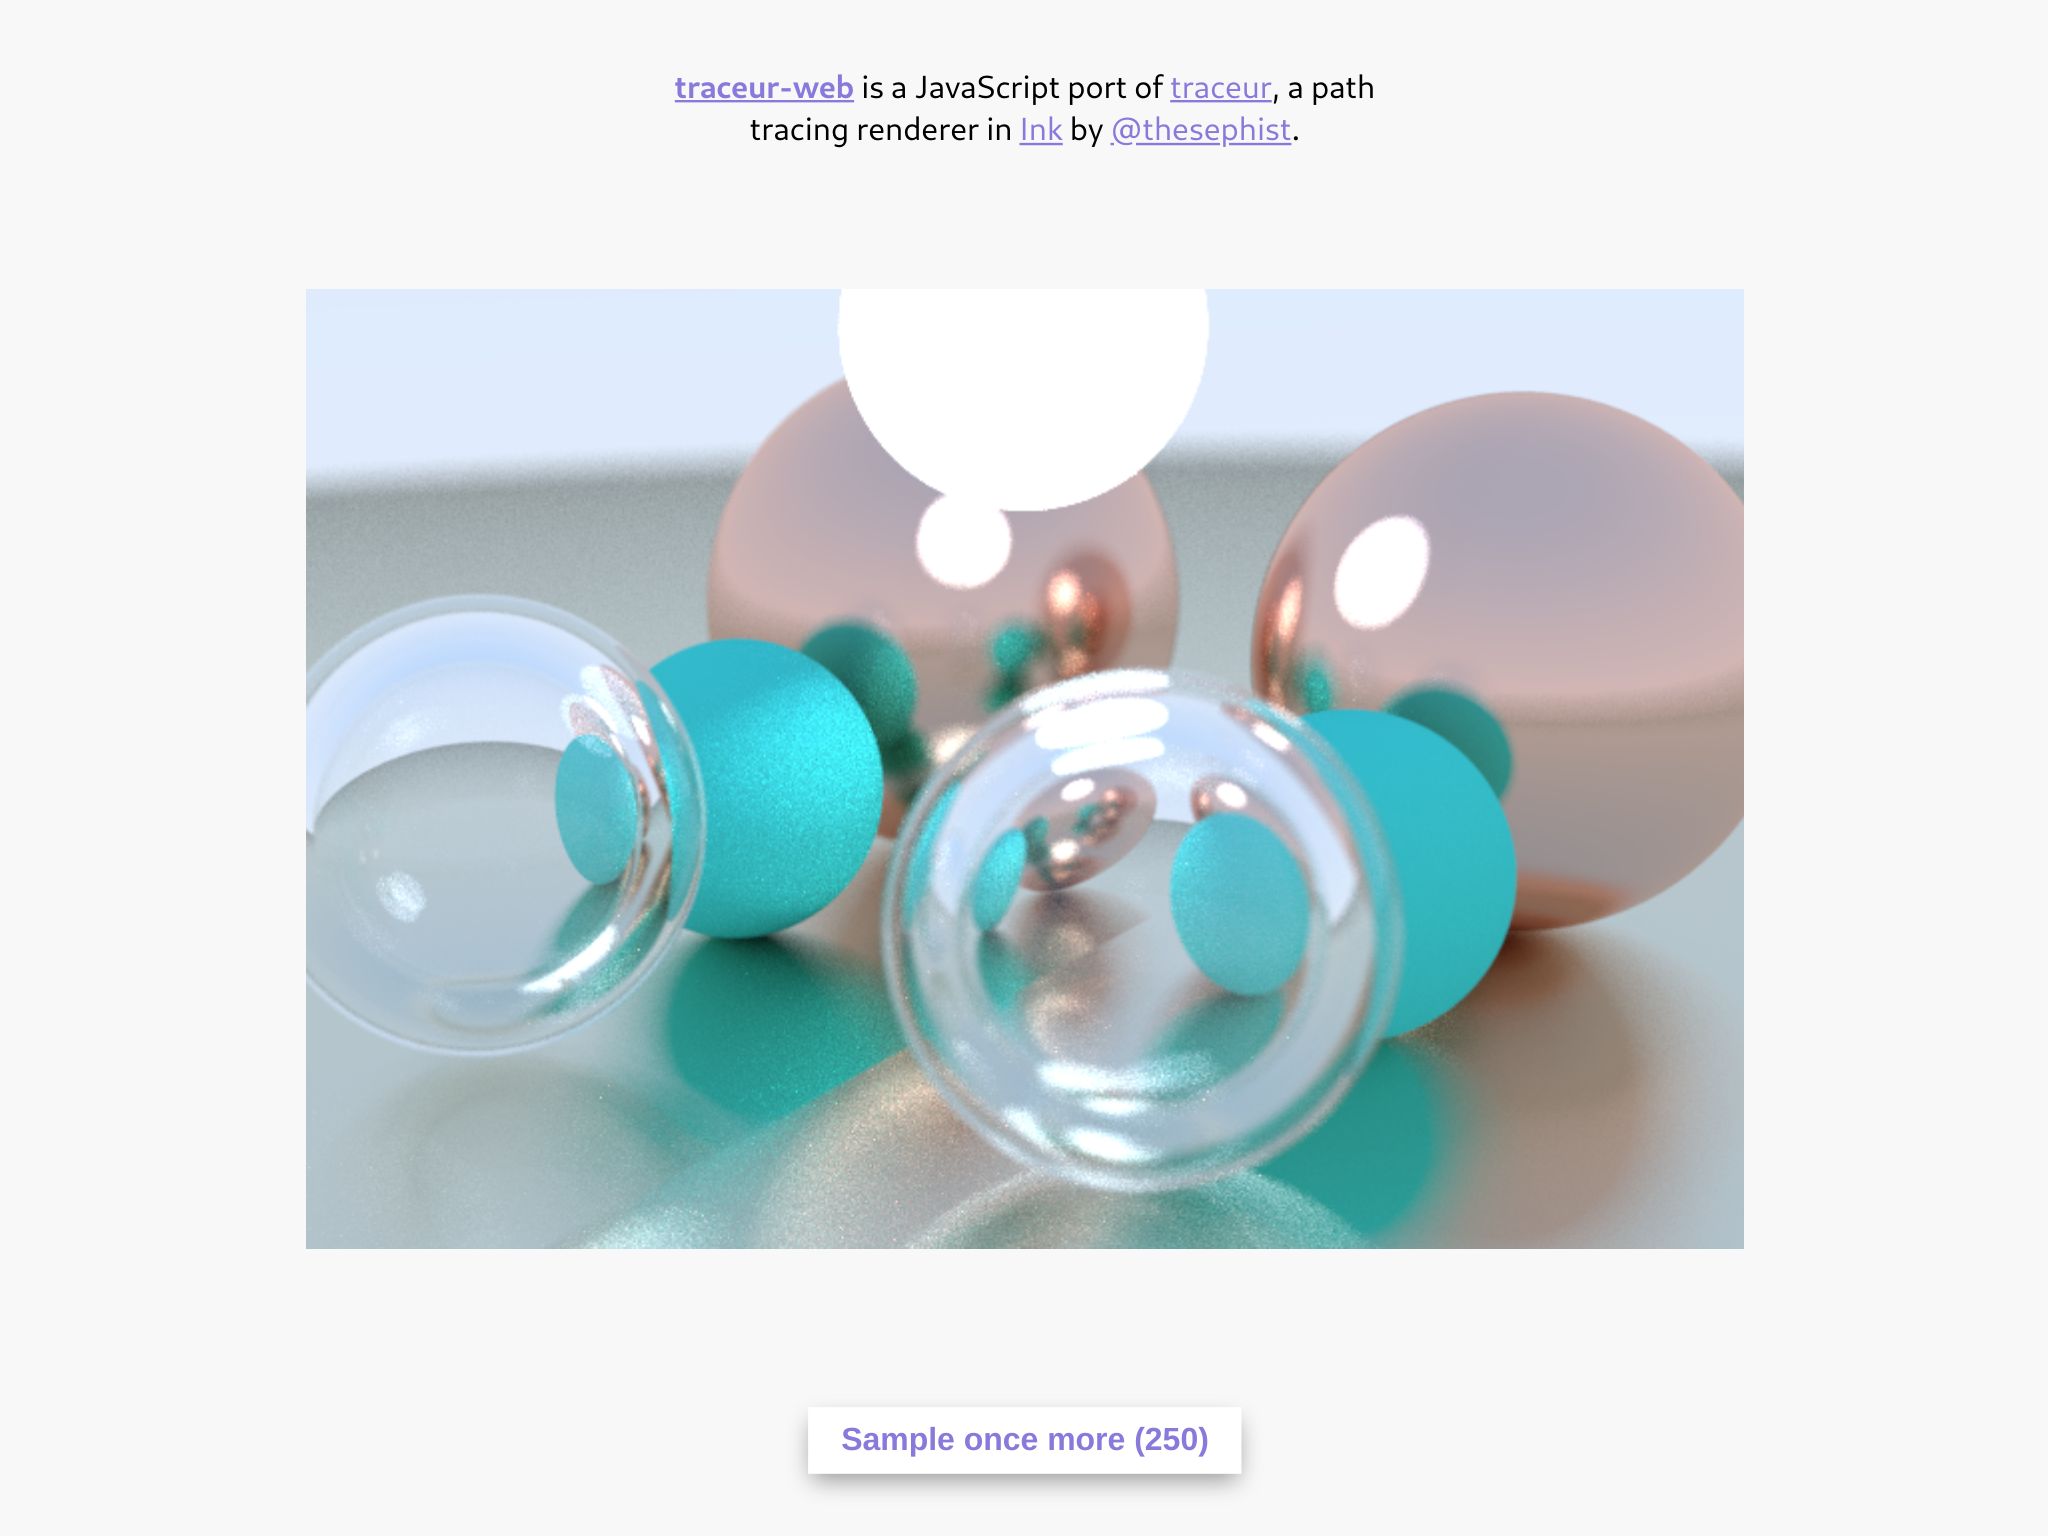
The following scene with a glass bubble, some matte and metallic spheres, and a mirror was rendered in Traceur. (If you have issues viewing the .bmp image file that Traceur works with, see the PNG equivalent here.)

Building Traceur was an interesting opportunity for me to step into the world of 3D rendering, as well as test out Ink on a larger project than my previous Ink projects, with some learnings about programming in the language and implementing path tracing. I want to share my experience with you in this post.
Rendering with physics
3D rendering is a neverending quest to understand and emulate how real-world objects interact with light.
With our mortal, finite-sized, finite-speed computers, it’s impossible to accurately model every photon and atom interacting in a scene. So instead, to render 3D scenes, engineers and artists have been relying on creative hacks to approximate lighting and color without simulating light accurately. Modern techniques for photorealistic rendering fall into two camps:
Rasterization is a process of projecting objects in the scene onto the viewport (the “camera” screen). Rasterization has been the popular approach to 3D rendering for a long time, because it’s faster than ray tracing or path tracing. In rasterization, rather than simulating the behavior of light accurately, we try to do only the computational work required for the parts of the scene the camera can see, and layer on other effects for realism. This makes rasterization efficient enough for use in video games and real-time rendering (people also call this “online rendering”), but because pure rasterization disregards parts of the scene the camera can’t see, it fails to render realistic reflections and other ambient effects, like light diffusing out from objects out of the frame. Creative graphics engineers have found ways to push this limitation, like global illumination, but these are hacks around the constraint, not perfect solutions.
Physically based rendering, which broadly includes ray tracing and path tracing, tries to simulate the real behavior of light and physical materials in an environment as closely as possible. In physically based rendering techniques, we study how real-world materials and atmosphere interacts with light, how light reflects and scatters from real surfaces, and build mathematical models for these laws of physics that we can simulate in our renderer to produce photorealistic results. This kind of rendering is much more computationally expensive, and can take anywhere from minutes to days to render a single frame of a scene, so it’s rarely used by itself for real-time rendering. But because PBR produces the most realistic results, many artists and animators use it for its visual accuracy.
Regardless of which rendering method we use to draw a scene, we have to contend with a fundamental tradeoff between performance and realism. Much of the innovation in photorealistic 3D rendering is about finding better balances between these two opposing goals. This page showing a list of different renderings of the Cornell Box demonstrates a few different points along this tradeoff spectrum, from efficient to realistic.
Path tracing, which Traceur implements, is at the far end of the “realistic” side of this tradeoff – it’s computationally expensive, but produces results that can be very close to reality.
Path tracing
Path tracing is popular because it can achieve good photorealistic results by combining simple algorithms and building blocks. Here’s how path tracing works, in brief.
In the real world, we see a scene because rays of light from a light source spread out into the world, and bounce off objects in the space. The light changes color and strength at each reflection, diffusion, or refraction when it hits something new, and we see the light when it finally enters our eye, having hit surfaces in its path that influences what color we see at that point in our field of view.
In path tracing, we invert this process. To render a scene, we want to know what color each pixel should be. So we “cast” rays in the direction of each pixel on our screen from our point of view, and simulate how light would reflect off surfaces in the scene in its path, until our backwards-simulated ray of light reaches a light source. In this process, we can determine the color of the light we’d see at that point in our rendered scene.
In practice, a path tracer traces light like this many times for each pixel, to simulate probabilistic effects like diffusion, refraction, and focus blur, and averages the result to obtain a final color. The more times we sample each point, the more accurate and smoother the resulting render. This is one of the reasons why path tracing is computationally expensive. The quality of a render increases directly with how many times we crunch the numbers.
Beyond the high-fidelity output, path tracing is also an interesting and rewarding programming problem, because simulating these simple laws of physics about how light reflects and diffuses over materials, yields complex and visually interesting results in the output.
Building Traceur
Why write a path tracer in Ink?
I built Traceur primarily to learn, and most of Traceur is a direct port of the C++ code covered in the guide I mention below. I wanted a gentle and solid introduction to photorealistic rendering and path tracing that I could build on, and I think I was successful in this goal.
I decided to write the renderer in Ink because I didn’t particularly care about speed, and I enjoy writing Ink programs. Traceur was also a good opportunity to test-drive Ink on a non-trivial project. Traceur is only the third significant project I’ve written in Ink, following Polyx and inkfmt. Working on Traceur was an opportunity to settle on good conventions for organizing and structuring Ink code for projects of this size, and a chance to get a sense of Ink’s performance in heavy (but realistic) numerical workloads.
Building a path tracer is a pleasingly iterative process. We can start with a basic proof-of-concept that simply computes where light rays intersect with objects on the scene, and add more detail to the render by programming in the finer nuances of lighting and materials one step at a time. I followed the excellent Ray Tracing in One Weekend guide in building the first version of Traceur, and shared some progress updates on Twitter. I won’t explain path tracing in detail in this post as the guide above and resources linked later in this post do it better than I ever could. Here, I’ll focus on my own experience.
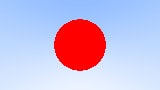
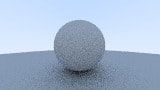
The first “working” version of Traceur in the process did one thing: cast rays into the scene from the camera at each pixel, and place a red pixel on screen if there is an intersection with a sphere, and a sky-blue gradient otherwise.
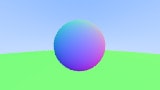
Here’s the output after Traceur could compute surface normals. This output also includes antialiasing, which computes the pixel color multiple times at each pixel with slight variations to average them together for a visually smoother final result. You can also see that I added a very large second sphere to be the “ground.”
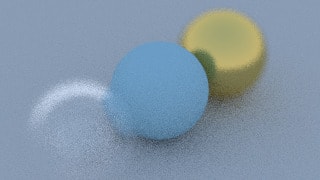
This is the first real image where Traceur was actually “path tracing.” You can see the shadow underneath the sphere in the matte material and the roughness of the render from insufficient antialiasing.
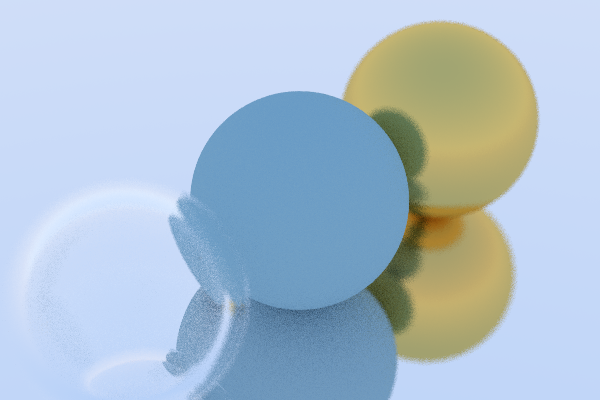
Here, we introduce other kinds of more interesting surface materials. Surface materials are implemented with different algorithms for how a ray is scattered or reflected from the material surface. We have metals of different smoothness on both sides, and glass in the middle.
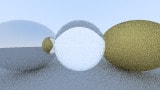
In this final sample, Traceur additionally added a focus blur for some depth of field to the two spheres on either side. This render is also at a different camera angle than the others, a feature added at this time in the project.
Traceur outputs images in the BMP bitmap file format, which is a lossless binary image format. This was a convenient choice because Ink had a BMP encoder library from my previous experiments rendering fractal sets in Ink. Most of the samples here are in the JPG format for size, but the first image on this page is a full-size render straight from Traceur with no post-processing, in Traceur’s native BMP format.
Aside: object-oriented idioms in Ink
(If you’re not very interested in the minutiae of Ink programming, feel free to skip this section.)
Path tracing very naturally lends itself to object-oriented programs. Arithmetic defined on 3-dimensional vectors, scattering and intersection behaviors on materials and shapes, positioning and moving cameras and objects in the scene – these are all naturally expressed as methods on objects. Ink, however, was designed as a functional language. While working on Traceur, I created an Ink idiom for object-oriented programming-style “objects” that encapsulates behavior in the way we want to use it, bound to object instances.
Let’s say we want some Material type that looks like
class Metal {
    constructor(color, fuzz) {
        this.color = color;
        this.fuzz = fuzz;
    }
    scatter(ray, hit, attenuation, scattered) {
        attenuation = this.color;
        // .. some code ...
    }
}

const mat = new Metal([1, 1, 1], 0.5);

mat.scatter(r, h, att, sc) // ... call method
the core of the Metal class is that we can call its constructor, new Metal(), to create an object that contains its properties and encapsulates behavior. Although Ink doesn’t have class-based objects built in, we can emulate this idea with the following Ink code.
Metal := (color, fuzz) => {
    scatter: (ray, hit, attenuation, scattered) => (
        attenuation := this.color
        ` ... some code ... `
    )
}

mat := Metal([1, 1, 1], 0.5)
(mat.scatter)(r, h, att, sc) `` ... call method
Here, Metal is simply a function that takes the material’s properties and returns a map of names to functions as an object. The object has methods that are functions closed over the properties passed in to the constructor. In this way, we can create and use objects with the same kind of ergonomics that dynamically typed object-oriented languages offer, but without the built-in class-based abstraction.
Traceur uses this kind of object-oriented style to abstract the camera, shapes, and materials, but not vectors, for performance reasons (creating objects like this causes unnecessary memory allocation, which would have meant performance hits for vector ops used in basically every operation in the path tracer).
Traceur Web, a JavaScript port
As I started testing Traceur to render images, I felt limited by the slow debug and feedback loop. Ink itself isn’t a fast language, especially for numerically intensive workloads like path tracing, but Traceur also saves the output to a file, so to see the results of a render, I’d have to change the code, run the render, and open the file to see what changes I wanted to make to the scene.
To get around this issue, I decided to port Traceur to JavaScript. Since Ink is semantically very similar to JavaScript, the JavaScript port of Traceur, Traceur Web, is a line-by-line translation of the Ink Traceur program, with special attention paid for V8 to be able to easily inline and optimize common function calls. It runs a couple of orders of magnitude faster than the Ink equivalent, and renders interactively to an HTML canvas, for a faster feedback loop.
Traceur Web is live on Repl.it. If you want to get a feel for how path tracing works, you can check out the live demo or see the source code on GitHub (above) or Repl.it.
Resources and further reading
After working through the initial prototype of Traceur, I ended up diving into lots of articles and blog posts about photorealistic rendering and path tracing while researching how best to build and optimize a path tracer. I’ve collected some of the best here.
First, some pieces on path tracing itself:
- Kevin Beacon’s smallpt is a small C++ program that implements a full path tracer without any egregious code obfuscation. The post also breaks down how the code works line-by-line, which is helpful to understanding path tracing in a single picture.
- Pixar’s recruiting flyer once included a full path tracer, albeit with some C++ obfuscation tricks. This post breaks down how the code works in detail, and also explores some of the tradeoffs that the program makes between fidelity and speed. The Pixar path tracer is also interesting because it squeezes a full 3D model of the letters
PIXARinto the path tracer code.- There’s an even older precedent for “path tracer on a business card,” which is explored in this post.
- The Haskell wiki has an overview of a path tracer written in Haskell.
There’s also a wider range of literature and current research on photorealistic rendering in general:
- Unity’s documentation is an interesting overview of the kinds of real-time rendering techniques practiced today. Here’s a page on global illumination.
- Renderman, Pixar’s proprietary rendering software, has lots of interesting manual pages to dig through about high fidelity offline rendering methods in the industry. Here’s a page on stratified sampling, which is a way of reducing aliasing / pixelation in a path traced render.
- Wikipedia pages for specific lighting and rendering techniques are interesting starting points for further exploration. Some topics I found interesting are bounding volume hierarchies and BRDFs.
- Traceur and most basic path tracers treat light as a simple RGB (red, green, blue) triplet, but in reality, light spectra are more continuous. Spectral path tracing tries to be more faithful to the spectral nature of light, for specific coloring effects like chromatic aberrations.
Future work
Like compilers and interpreters, photorealistic rendering is an actively evolving and historically rich field. As I come back to Traceur in the future, here’s what I want to add to its arsenal of rendering tools.
- Support for object lighting. Currently, objects are lit in Traceur scenes with light from the background (the “sky” in the renders). I could simulate “lights” by having extremely luminescent materials in brightly lit scenes, but explicit support for lights in the scene would be a quick and useful addition. Lighting with objects also gives us realistic caustics.
- Support for shapes that aren’t spheres or “planes” emulated with very large spheres
- Volumetric rendering, with which we can render translucent and transparent materials like liquids and gels
- Patterns and textures on objects
Photorealistic rendering has been fascinating to dive into. I’ve really enjoyed tasting the tip of the iceberg with Traceur, and hope to come back to hack on it further.